Thursday, May 3, 2012

How to create Simple MVC Application

Pre-requisite for MVC

• Visual Studio 2010 or the free Visual Web Developer 2010 Express. These include ASP.NET MVC 2 template by default.
• Visual Studio 2008 SP1 (any edition) or the free Visual Web Developer 2008 Express with SP1. These do not include ASP.NET MVC 2 by default; you must also download and install ASP.NET MVC 2 from http://www.asp.net/mvc/  .


Goal: - Create a simple ASPX page with Hello world controller.

In this lab we will create a simple hello world program using MVC template. So we will create a simple controller, attach the controller to simple index.aspx page and view the display on the browser.

Video demonstration

In case you are fed up to read the complete article watch the below 5 minutes video to understand the same.

Step1:- Create project

Create a new project by selecting the MVC 2 empty web application template as shown in the below figure.


Once you click ok, you have a readymade structure with appropriate folders where you can add controllers, models and views.


Step 2:- Add controller

So let’s go and add a new controller as shown in the below figure.


Once you add the new controller you should see some kind of code snippet as shown in the below snippet.
public class Default1Controller : Controller
{
//
// GET: /Default1/
public ActionResult Index()
{
return View();
}
}

Step 3:- Add View


Now that we have the controller we need to go and add the view. So click on the Index function which is present in the control and click on add view menu as shown in the below figure.


The add view pops up a modal box to enter view name which will be invoked when this controller is called as shown in the figure below. For now keep the view name same as the controller name and also uncheck the master page check box.
Once you click on the ok button of the view, you should see a simple ASPX page with the below HTML code snippet. In the below HTML code snippet I have added “This is my first MVC application”.

Step 4:- Run the application


If you do a CNTRL + F5 you should see an error as shown in the below figure. This error is obvious because we have not invoked the appropriate controller / action.


If you append the proper controller on the URL you should be able to see the proper view.


So have a toast of beer for your first ASP.NET MVC application.


So what’s in the next tutorial?

Now that we have created a simple MVC hello world, it’s time to see how we can pass data from controllers to views. The first hit comes to the controller which will load your business objects or model and you would like to transfer these objects to the view to display them. Click here to view the 2nd part of ASP.NET MVC in article.

Explain About Normlization

If you've been working with databases for a while, chances are you've heard the term normalization. Perhaps someone's asked you "Is that database normalized?" or "Is that in BCNF?" All too often, the reply is "Uh, yeah." Normalization is often brushed aside as a luxury that only academics have time for. However, knowing the principles of normalization and applying them to your daily database design tasks really isn't all that complicated and it could drastically improve the performance of your DBMS.

In this article, we'll introduce the concept of normalization and take a brief look at the most common normal forms. Future articles will provide in-depth explorations of the normalization process.


The Normal Forms

The database community has developed a series of guidelines for ensuring that databases are normalized. These are referred to as normal forms and are numbered from one (the lowest form of normalization, referred to as first normal form or 1NF) through five (fifth normal form or 5NF). In practical applications, you'll often see 1NF, 2NF, and 3NF along with the occasional 4NF. Fifth normal form is very rarely seen and won't be discussed in this article.

Before we begin our discussion of the normal forms, it's important to point out that they are guidelines and guidelines only. Occasionally, it becomes necessary to stray from them to meet practical business requirements. However, when variations take place, it's extremely important to evaluate any possible ramifications they could have on your system and account for possible inconsistencies. That said, let's explore the normal forms.


First Normal Form (1NF)

First Normal Form (1NF) sets the very basic rules for an organized database:
  • Eliminate duplicative columns from the same table.
  • Create separate tables for each group of related data and identify each row with a unique column (the primary key).
What do these rules mean when contemplating the practical design of a database? It’s actually quite simple.
The first rule dictates that we must not duplicate data within the same row of a table. Within the database community, this concept is referred to as the atomicity of a table. Tables that comply with this rule are said to be atomic. Let’s explore this principle with a classic example – a table within a human resources database that stores the manager-subordinate relationship. For the purposes of our example, we’ll impose the business rule that each manager may have one or more subordinates while each subordinate may have only one manager.
Intuitively, when creating a list or spreadsheet to track this information, we might create a table with the following fields:
  • Manager
  • Subordinate1
  • Subordinate2
  • Subordinate3
  • Subordinate4
However, recall the first rule imposed by 1NF: eliminate duplicative columns from the same table. Clearly, the Subordinate1-Subordinate4 columns are duplicative. Take a moment and ponder the problems raised by this scenario. If a manager only has one subordinate – the Subordinate2-Subordinate4 columns are simply wasted storage space (a precious database commodity). Furthermore, imagine the case where a manager already has 4 subordinates – what happens if she takes on another employee? The whole table structure would require modification.
At this point, a second bright idea usually occurs to database novices: We don’t want to have more than one column and we want to allow for a flexible amount of data storage. Let’s try something like this:
  • Manager
  • Subordinates
where the Subordinates field contains multiple entries in the form "Mary, Bill, Joe"
This solution is closer, but it also falls short of the mark. The subordinates column is still duplicative and non-atomic. What happens when we need to add or remove a subordinate? We need to read and write the entire contents of the table. That’s not a big deal in this situation, but what if one manager had one hundred employees? Also, it complicates the process of selecting data from the database in future queries.
Here’s a table that satisfies the first rule of 1NF:
  • Manager
  • Subordinate
In this case, each subordinate has a single entry, but managers may have multiple entries.
Now, what about the second rule: identify each row with a unique column or set of columns (the primary key)? You might take a look at the table above and suggest the use of the subordinate column as a primary key. In fact, the subordinate column is a good candidate for a primary key due to the fact that our business rules specified that each subordinate may have only one manager. However, the data that we’ve chosen to store in our table makes this a less than ideal solution. What happens if we hire another employee named Jim? How do we store his manager-subordinate relationship in the database?
It’s best to use a truly unique identifier (such as an employee ID) as a primary key. Our final table would look like this:
  • Manager ID
  • Subordinate ID
Now, our table is in first normal form! If you'd like to continue learning about normalization, read the other articles in this series:

Second Normal Form (2NF)


 Over the past month, we've looked at several aspects of normalizing a database table. First, we discussed the basic principles of database normalization. Last time, we explored the basic requirements laid down by the first normal form (1NF). Now, let's continue our journey and cover the principles of second normal form (2NF).

Recall the general requirements of 2NF:
  • Remove subsets of data that apply to multiple rows of a table and place them in separate tables.
  • Create relationships between these new tables and their predecessors through the use of foreign keys.
These rules can be summarized in a simple statement: 2NF attempts to reduce the amount of redundant data in a table by extracting it, placing it in new table(s) and creating relationships between those tables.

Let's look at an example. Imagine an online store that maintains customer information in a database. They might have a single table called Customers with the following elements:
  • CustNum
  • FirstName
  • LastName
  • Address
  • City
  • State
  • ZIP
A brief look at this table reveals a small amount of redundant data. We're storing the "Sea Cliff, NY 11579" and "Miami, FL 33157" entries twice each. Now, that might not seem like too much added storage in our simple example, but imagine the wasted space if we had thousands of rows in our table. Additionally, if the ZIP code for Sea Cliff were to change, we'd need to make that change in many places throughout the database.

In a 2NF-compliant database structure, this redundant information is extracted and stored in a separate table. Our new table (let's call it ZIPs) might have the following fields:
  • ZIP
  • City
  • State
If we want to be super-efficient, we can even fill this table in advance -- the post office provides a directory of all valid ZIP codes and their city/state relationships. Surely, you've encountered a situation where this type of database was utilized. Someone taking an order might have asked you for your ZIP code first and then knew the city and state you were calling from. This type of arrangement reduces operator error and increases efficiency.

Now that we've removed the duplicative data from the Customers table, we've satisfied the first rule of second normal form. We still need to use a foreign key to tie the two tables together. We'll use the ZIP code (the primary key from the ZIPs table) to create that relationship. Here's our new Customers table:
  • CustNum
  • FirstName
  • LastName
  • Address
  • ZIP
We've now minimized the amount of redundant information stored within the database and our structure is in second normal form!

Third Normal Form (3NF)

There are two basic requirements for a database to be in third normal form:
  • Already meet the requirements of both 1NF and 2NF
  • Remove columns that are not fully dependent upon the primary key.
Imagine that we have a table of widget orders that contains the following attributes:
  • Order Number
  • Customer Number
  • Unit Price
  • Quantity
  • Total
Remember, our first requirement is that the table must satisfy the requirements of 1NF and 2NF. Are there any duplicative columns? No. Do we have a primary key? Yes, the order number. Therefore, we satisfy the requirements of 1NF. Are there any subsets of data that apply to multiple rows? No, so we also satisfy the requirements of 2NF.
Now, are all of the columns fully dependent upon the primary key? The customer number varies with the order number and it doesn't appear to depend upon any of the other fields. What about the unit price? This field could be dependent upon the customer number in a situation where we charged each customer a set price. However, looking at the data above, it appears we sometimes charge the same customer different prices. Therefore, the unit price is fully dependent upon the order number. The quantity of items also varies from order to order, so we're OK there.
What about the total? It looks like we might be in trouble here. The total can be derived by multiplying the unit price by the quantity, therefore it's not fully dependent upon the primary key. We must remove it from the table to comply with the third normal form. Perhaps we use the following attributes:
  • Order Number
  • Customer Number
  • Unit Price
  • Quantity
Now our table is in 3NF. But, you might ask, what about the total? This is a derived field and it's best not to store it in the database at all. We can simply compute it "on the fly" when performing database queries. For example, we might have previously used this query to retrieve order numbers and totals:
 SELECT OrderNumber, Total
 FROM WidgetOrders
 
We can now use the following query:
 SELECT OrderNumber, UnitPrice * Quantity AS Total
 FROM WidgetOrders
 
to achieve the same results without violating normalization rules.

Boyce-Codd Normal Form (BCNF)

Definition: A relation is in Boyce-Codd Normal Form (BCNF) if every determinant is a candidate key. (See the links in the box at right for definitions of determinant and candidate key.)
Also Known As: BCNF
Examples:
Conisder a database table that stores employee information and has the attributes employee_id, first_name, last_name, title. In this table, the field employee_id determines first_name and last_name. Similarly, the tuple (first_name, last_name) determines employee_id.

Fourth Normal Form (4NF)

Finally, fourth normal form (4NF) has one additional requirement:
  • Meet all the requirements of the third normal form.
  • A relation is in 4NF if it has no multi-valued dependencies.
Remember, these normalization guidelines are cumulative. For a database to be in 2NF, it must first fulfill all the criteria of a 1NF database.


Multivalued Dependency

Definition: Multivalued dependencies occur when the presence of one or more rows in a table implies the presence of one or more other rows in that same table.

For more detail, read What is a Database Dependency?
Examples:
For example, imagine a car company that manufactures many models of car, but always makes both red and blue colors of each model. If you have a table that contains the model name, color and year of each car the company manufactures, there is a multivalued dependency in that table. If there is a row for a certain model name and year in blue, there must also be a similar row corresponding to the red version of that same car.

Should I Normalize?

While database normalization is often a good idea, it's not an absolute requirement. In fact, there are some cases where deliberately violating the rules of normalization is a good practice. For more on this topic, read

Difference Between Session and Cache

1.
A. Sessions may not improve performance whereas Cache will
improve site performance.

B. Sessions may change from user to user whereas a single
Cache will be maintained for the entire application.

C. Cache wont maintain any state, whereas Sessions will
maintain separate state for every user.

2.
Yes Cache is accessible through out entire application
3.
Application beacuse application object is share by entire
application.

Explain About Fetch Status in Cursor in SQl

Returns the status of the last cursor FETCH statement issued against any cursor currently opened by the connection.

Return value Description
0 FETCH statement was successful.
-1 FETCH statement failed or the row was beyond the result set.
-2 Row fetched is missing.

Syntax
@@FETCH_STATUS
Return Types
integer
Remarks
Because @@FETCH_STATUS is global to all cursors on a connection, use @@FETCH_STATUS carefully. After a FETCH statement is executed, the test for @@FETCH_STATUS must occur before any other FETCH statement is executed against another cursor. The value of @@FETCH_STATUS is undefined before any fetches have occurred on the connection.
For example, a user executes a FETCH statement from one cursor, and then calls a stored procedure that opens and processes the results from another cursor. When control is returned from the called stored procedure, @@FETCH_STATUS reflects the last FETCH executed in the stored procedure, not the FETCH statement executed before the stored procedure is called.
Examples
This example uses @@FETCH_STATUS to control cursor activities in a WHILE loop.
DECLARE Employee_Cursor CURSOR FOR
SELECT LastName, FirstName FROM Northwind.dbo.Employees
OPEN Employee_Cursor
FETCH NEXT FROM Employee_Cursor
WHILE @@FETCH_STATUS = 0
BEGIN
   FETCH NEXT FROM Employee_Cursor
END
CLOSE Employee_Cursor
DEALLOCATE Employee_Cursor

Add Check Box Inside DataGrid in C# windows Application

This article will explain you how to insert Checkbox inside DataGridView in windows application. This article is for beginners.

First create a windows application from Visual Studio Menu File->Project-> Then select C#->Windows Form Application.


Then add DataGridView from toolbox of Visual Studio. And also add One Button to test the CheckBox Value inside DatGridView.

Now from the property window of DataGridView Select the Columns Property.
You will see this screen:


Click on the (Collection) button from the above shown window.
You will see the below screen:


From this window click on "Add" button.
You will see below window:


From the above window select "Type" as "GridViewCheckboxColumn" Column as shown in above window
Then press Add Button from above Window.
Now you have added the checkbox DataGridView in windows application. Now it's time to add some code in your .cs file .

Now create one function, which will return a DataTable with sample data containing in it. This Data Table  will bind to DataGridView.
  /// <summary>
        /// Create DataTable to add to DataGridView
        /// </summary>
        /// <returns>DataTabe</returns>
        private DataTable SampleDataTable()
        {
            DataTable dt = new DataTable("MyDataTable");
            //Create columns and add to DataTable;
            DataColumn dcID = new DataColumn("ID");
            dt.Columns.Add(dcID); //ID column created and add to DataTable
            DataColumn dcSomeText = new DataColumn("SomeText");
            dt.Columns.Add(dcSomeText); //LastName column created and add to DataTable
            //Now Add some data to the DataTable
            DataRow dr;
            for (int count = 0; count <= 9; count++)
            {
                dr = dt.NewRow();
                dr["ID"] = count;
                dr["SomeText"] = "Some Text " + count;
                dt.Rows.Add(dr);
            }
            return dt;
        }

On the FormLoad_Event add this line of code to bind SampleDataTable() as a datasource of of windows application like this
private void Form1_Load(object sender, EventArgs e)
{
      myDataGridView.DataSource = SampleDataTable();
}

Now on Button click Event add this line of code to check what all rows user has selected from DataGridView.
private void btnSubmit_Click(object sender, EventArgs e)
{
     foreach (DataGridViewRow dr in myDataGridView.Rows)
     {
         if(dr.Cells[0].Value != null) //Cells[0] Because in cell 0th cell we have added checkbox
          {
                    MessageBox.Show("Rows " +dr.Index + " selected");
          }
      }
}
Now, its time to run the application,once you run your application you will see the output window like this:


Now, select the check box and press the Get Selected Rows Button. You will see this window:

Dynamically create template Field in GridView

In some complex scenarios developers need to create runtime GridView dynamically. So obviously developers need to create dynamic columns for dynamic gridviews. Here in this article I will explain how one can develop or implement runtime dynamically create bound column as well as template column of a GridView control and also how to bind data into the dynamically created GridView. For simplicity here I use a datatable but you can bind data from database as well. Here I also showed how developers can write dynamic event handler for dynamically created button within the template column. The output will be:

1.gif 

Creating bound column is easier than template column because if you want to add dynamic template column in your GridView then you must implement ITemplate interface. When you instantiate the implemented object then it will automatically call the "InstantiateIn" method. To implement my example first add a class in your project and named it "TemplateHandler". Then copy the code sample:

using System;
using System.Web.UI;
using System.Web.UI.WebControls;

public class TemplateHandler : ITemplate
{
    void ITemplate.InstantiateIn(Control container)
    {
        Button cmd = new Button();
        cmd.ID = "cmd";
        cmd.Text = "HI";
        cmd.Click += new EventHandler(Dynamic_Method);
        container.Controls.Add(cmd);
    }
    protected void Dynamic_Method(object sender, EventArgs e)
    {
        ((Button)sender).Text = "Hellooooo";
    }
}

Now add a page in your project & copy the below codes under page_load event:

protected void Page_Load(object sender, EventArgs e)
{
    DataTable dt = new DataTable();
    dt.Columns.Add("FirstName");
    dt.Columns.Add("LastName");
    dt.Columns.Add("Age", typeof(System.Int32));
    DataRow oItem = dt.NewRow();
    oItem[0] = "Shawpnendu";
    oItem[1] = "Bikash";
    oItem[2] = 32;
    dt.Rows.Add(oItem);
    oItem = dt.NewRow();
    oItem[0] = "Bimalendu";
    oItem[1] = "Bikash";
    oItem[2] = 27;
    dt.Rows.Add(oItem);
    GridView gv = new GridView();
    gv.AutoGenerateColumns = false;
    BoundField nameColumn = new BoundField();
    nameColumn.DataField = "FirstName";
    nameColumn.HeaderText = "First Name";
    gv.Columns.Add(nameColumn);
    nameColumn = new BoundField();
    nameColumn.DataField = "LastName";
    nameColumn.HeaderText = "Last Name";
    gv.Columns.Add(nameColumn);
    nameColumn = new BoundField();
    nameColumn.DataField = "Age";
    nameColumn.HeaderText = "Age";
    gv.Columns.Add(nameColumn);
    // Here is template column portion
    TemplateField TmpCol = new TemplateField();
    TmpCol.HeaderText = "Click Me";
    gv.Columns.Add(TmpCol);
    TmpCol.ItemTemplate = new TemplateHandler();
    gv.DataSource = dt;
    gv.DataBind();
    Form.Controls.Add(gv);
}

Now run the page & click on the button that i have added in a template column will say you "Helloooo".

Here I showed an example how one can create runtime gridview with bound & template column. Experiment it & hope you will achieve your client target.

Data Table Properties

In this article, I am going to explain how to Add, Modify, Delete, Sort, Filter rows of the DataTable and also loading data from xml and writing data into xml. I will also talk about writing/reading Schema of the DataTable.


Introduction
DataTable is a central object in the ADO.NET library. If you are working with ADO.NET - accessing data from database, you can not escape from DataTable. Other objects that use DataTable are DataSet and DataView. In this tutorials, I will explain how to work with DataTable. I have tried to cover most of the frequently used activity in the DataTable, I hope you will like it.


Creating a DataTable
To create a DataTable, you need to use System.Data namespace, generally when you create a new class or page, it is included by default by the Visual Studio. Lets write following code to create a DataTable object. Here, I have pased a string as the DataTable name while creating DataTable object.
// instantiate DataTableDataTable dTable = new DataTable("Dynamically_Generated");
Creating Columns in the DataTable
To create column in the DataTable, you need to use DataColumn object. Instantiate the DataColumn object and pass column name and its data type as parameter. Then call add method of DataTable column and pass the DataColumn object as parameter.
// create columns for the DataTable

DataColumn auto = new DataColumn("AutoID", typeof(System.Int32));

dTable.Columns.Add(auto);

// create another column

DataColumn name = new DataColumn("Name", typeof(string));

dTable.Columns.Add(name);

// create one more column

DataColumn address = new DataColumn("Address", typeof(string));

dTable.Columns.Add(address);
Specifying AutoIncrement column in the DataTable
To specify a column as AutoIncrement (naturally it should be an integer type of field only), you need to set some properties of the column like AutoIncrement, AutoIncrementSeed. See the code below, here I am setting the first column "AutoID" as autoincrement field. Whenever a new row will be added its value will automatically increase by 1 as I am specified AutoIncrementSeed value as 1.
// specify it as auto increment field

auto.AutoIncrement = true;

auto.AutoIncrementSeed = 1;

auto.ReadOnly = true;
If you want a particular column to be a unique column ie. you don't want duplicate records into that column, then set its Unique property to true like below.
auto.Unique = true;
Specifying Primary Key column in the DataTable
To set the primary key column in the DataTable, you need to create arrays of column and store column you want as primary key for the DataTable and set its PrimaryKey property to the column arrays. See the code below.
// create primary key on this fieldDataColumn[] pK = new DataColumn[1];

pK[0] = auto;

dTable.PrimaryKey = pK;
Till now we have created the DataTable, now lets populate the DataTable with some data.
Populating data into DataTable
There are two ways to populate DataTable.
Using DataRow object
Look at the code below, I have created a DataRow object above the loop and I am assiging its value to the dTable.NewRow() inside the loop. After specifying columns value, I am adding that row to the DataTable using dTable.Rows.Add method.
// populate the DataTable using DataRow objectDataRow row = null;

for (int i = 0; i < 5; i++)

{

row = dTable.NewRow(); row["AutoID"] = i + 1; row["Name"] = i + " - Ram"; row["Address"] = "Ram Nagar, India - " + i; dTable.Rows.Add(row);
}
Instead of using the column name, you can use ColumnIndex too, however it is not suggested as you might want to add a column in the mid of the table then you will need to change your code wherever you have specified the index of the column. Same applies while reading or writing values into Database column.
Asiging the value of column using Arrays
In following code, I have specified the values of every column as the array separated by comma (,) in the Add method of the dTable.Rows.
// manually adding rows using array of valuesdTable.Rows.Add(6, "Manual Data - 1", "Manual Address - 1, USA");

dTable.Rows.Add(7, "Manual Data - 2", "Manual Address - 2, USA");
Modifying data into DataTable
Modifying Row Data
To edit the data of the row, sets its column value using row index or by specifying the column name. In below example, I am updating the 3rd row of the DataTable as I have specified the row index as 2 (dTable.Rows[2]).
// modify certain values into the DataTabledTable.Rows[2]["AutoID"] = 20;

dTable.Rows[2]["Name"] = "Modified";

dTable.Rows[2]["Address"] = "Modified Address";

dTable.AcceptChanges();
Deleting Row
To delete a row into DataTable, call the rows.Delete() method followed by AcceptChanges() method. AcceptChanges() method commits all the changes made by you to the DataTable. Here Row[1] is the index of the row, in this case 2nd row will be deleted as in collection (here rows collection) count start from 0.
// Delete rowdTable.Rows[1].Delete();

dTable.AcceptChanges();

Filtering data from DataTable
To filter records from the DataTable, use Select method and pass necessary filter expression. In below code, the 1st line will simply filter all rows whose AutoID value is greater than 5. The 2nd line of the code filters the DataTable whose AutoID value is greater than 5 after sorting it.
DataRow[] rows = dTable.Select(" AutoID > 5");

DataRow[] rows1 = dTable.Select(" AutoID > 5", "AuotID ASC");
Note that Select method of the DataTable returns the array of rows that matche the filter expression. If you want to loop through all the filtered rows, you can use foreach loop as shown below. In this code, I am adding all the filtered rows into another DataTable.
foreach (DataRow thisRow in rows)

{

// add values into the datatable dTable1.Rows.Add(thisRow.ItemArray);
}
Working with Aggregate functions (Updated on 18-Nov-08)
We can use almost all aggregate functions with DataTable, however the syntax is bit different than standard SQL.
Suppose we need to get the maximum value of a particular column, we can get it in the following way.
DataRow[] rows22 = dTable.Select("AutoID = max(AutoID)");

string str = "MaxAutoID: " + rows22[0]["AutoID"].ToString();
To get the sum of a particular column, we can use Compute method of the DataTable. Compute method of the DataTable takes two argument. The first argument is the expression to compute and second is the filter to limit the rows that evaluate in the expression. If we don't want any filteration (if we need only the sum of the AutoID column for all rows), we can leave the second parameter as blank ("").
object objSum = dTable.Compute("sum(AutoID)", "AutoID > 7");

string sum = "Sum: " + objSum.ToString();

// To get sum of AutoID for all rows of the DataTable

object objSum = dTable.Compute("sum(AutoID)", "");

Sorting data of DataTable
Oops !. There is no direct way of sorting DataTable rows like filtering (Select method to filter DataRows).
There are two ways you can do this.
Using DataView
See the code below. I have created a DataView object by passing my DataTable as parameter, so my DataView will have all the data of the DataTable. Now, simply call the Sort method of the DataView and pass the sort expression. Your DataView object have sorted records now, You can either directly specify the Source of the Data controls object like GridView, DataList to bind the data or if you need to loop through its data you can use ForEach loop as below.
// Sorting DataTableDataView dataView = new DataView(dTable);

dataView.Sort = " AutoID DESC, Name DESC";

foreach (DataRowView view in dataView)

{

Response.Write(view["Address"].ToString());
}
Using DataTable.Select() method
Yes, you can sort all the rows using Select method too provided you have not specified any filter expression. If you will specify the filter expression, ofcourse your rows will be sorted but filter will also be applied. A small drawback of this way of sorting is that it will return array of DataRows as descibed earlier so if you are planning to bind it to the Data controls like GridView or DataList you will have for form a DataTable by looping through because directly binding arrays of rows to the Data controls will not give desired results.
DataRow[] rows = dTable.Select("", "AutoID DESC");
Writing and Reading XmlSchema of the DataTable
If you need XmlSchema of the DataTabe, you can use WriteXmlSchema to write and ReadXmlSchema to read it. There are several overloads methods of both methods and you can pass filename, stream, TextReader, XmlReader etc. as the parameter. In this code, the schema will be written to the .xml file and will be read from there.
// creating schema definition of the DataTabledTable.WriteXmlSchema(Server.MapPath("~/DataTableSchema.xml"));

// Reading XmlSchema from the xml file we just created

DataTable dTableXmlSchema = new DataTable();

dTableXmlSchema.ReadXmlSchema(Server.MapPath("~/DataTableSchema.xml"));
Reading/Writing from/to Xml
If you have a scenario, where you need to write the data of the DataTable into xml format, you can use WriteXml method of the DataTable. Note that WriteXml method will not work if you will not specify the name of the DataTable object while creating it. Look at the first code block above, I have passed "Dynamically_Generated" string while creating the instance of the DataTable. If you will not specify the name of the DataTable then you will get error as WriteXml method will not be able to serialize the data without it.
// Note: In order to write the DataTable into XML, // you must define the name of the DataTable while creating it

// Also if you are planning to read back this XML into DataTable, you should define the XmlWriteMode.WriteSchema too 

// Otherwise ReadXml method will not understand simple xml file 

dTable.WriteXml(Server.MapPath("~/DataTable.xml"), XmlWriteMode.WriteSchema);

// Loading Data from XML into DataTable

DataTable dTableXml = new DataTable();

dTableXml.ReadXml(Server.MapPath("~/DataTable.xml"));
If you are planning to read the xml you have just created into the DataTable sometime later then you need to specify XmlWriteMode.WriteSchema too as the 2nd parameter while calling WriteXml method of the DataTable otherwise normally WriteXml method doesn't write schema of the DataTable. In the abscence of the schema, you will get error (DataTable does not support schema inference from Xml) while calling ReadXml method of the DataTable.

Create an EXE or Setup File in .NET Windows Application

Visual Studio Setup and deployment Projects provides to make an executable or installer file in .NET windows application is easy and rapidly.
Visual Studio provides templates for four types of deployment projects: Merge Module Project, Setup Project, Web Setup Project, and Cab Project. In addition, a Setup wizard is provided to help step you through the process of creating deployment projects. You can see the templates and the wizard in the New Project dialog box under the Setup and Deployment Projects node.
The following are guidelines for choosing the right type of deployment project for your project.
1)Merge Module Project : Packages components that might be shared by multiple applications.
2)Setup Project : Builds an installer for a Windows-based application.
3)Web Setup Project : Builds an installer for a Web application.
4)Cab Project : Creates a cabinet file for downloading to a legacy Web browser.
5)Smart Device Cab Project : Creates a Cab project to deploy device applications.
This topic demonstrates deployment using a Setup and Deployment Project.
Setup Projects
Setup projects allow you to create installers in order to distribute an application. The resulting Windows Installer (.msi) file contains the application, any dependent files, information about the application such as registry entries, and instructions for installation. When the .msi file is distributed and run on another computer, you can be assured that everything necessary for installation is included; if for any reason the installation fails (for example, the target computer does not have the required operating system version), the installation will be rolled back and the computer returned to its pre installation state.

I. Create Setup Project

The following steps will gives the elegant guidance to create an executable or installer file.
1. Go to file menu > click Add > new project >now “Add New Project” dialog will appear.

2. Select the “Other Project Types” and click “Setup and Deployment” projects,Choose “Setup Project” give name project name in name text box finally click OK.

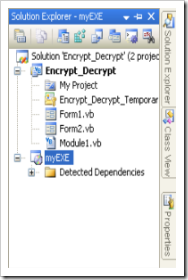
3. New project appear in solution explorer,for eg., you have give the name “MyEXE” file will be displays with given name.

4.Right click the MyEXE > go View > click “File System”

5.You can see the “File System on TargetMachine”under  three folders
Application Folder
User’s Desktop
User’s Program Menu

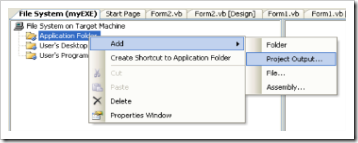
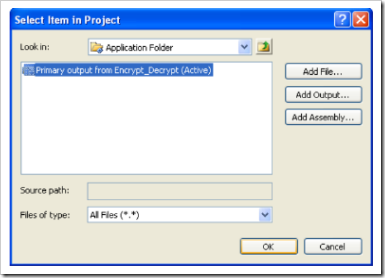
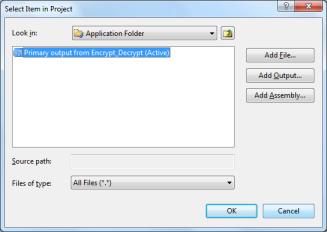
6.Select Application Folder and right click Add>Project Output>select Primary output

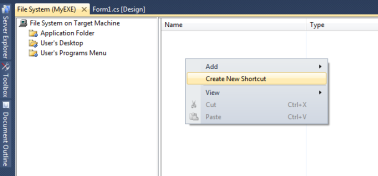
7. Select User’s Desktop right click on the right side pane>click create new shortcut>select output file from Application folder>change the file name from  primary output name to MyEXE

next >>

Same procedure follows the user’s program menu also
8.If you want to change the Manufactures name, just right click the project go to properties

change the properties as per you requirement
9.Finally Build the new project After successfully Build the project myEXE(Setup) will be appear in Application Debug or Release folder(depend upon the properties settings)

EXE or installer will be available on his physical path…

When you want to install  the EXE on the client machine, before you should be installed .NET Framework on that machine because, Applications and controls written for the .NET Framework v2.0 requires the .NET Framework Redistributable Package version 2.0 to be installed on the computer where the application or control runs.
you can get it from here

II. Create shortcut icon  in User’s Desktop and User’s Program Menu

Step1: Select ‘User’s Desktop’ or ‘User’s Program Menu’  and right click on right side pane
Create short cut on user's desktop
Step 2: Add primary output of actual application and click ‘OK’ to select

Step 3: Rename the actual name to your desired project/product name

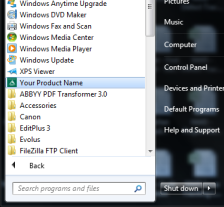
Step 4: Here the sample product name is ‘Your Product Name’ for demo purpose

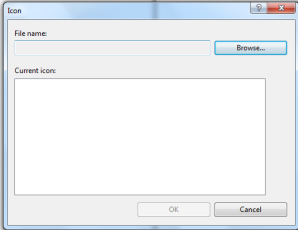
Step 5: If we want to add icon on shortcut, Click Properties Window

Step 6: Select Icon, next Browse icon file

Step 7:  Browse Icon File (Format should be .ico, other formats are not acceptable)

Step 8: Click  ‘Application Folder’

Step 9: Add File button will enable once you have clicked Application Folder

Step 10: Select your product icon from somewhere in system and Click ‘OK’
User should follow the same steps for shortcut added to User’s Program Menu.
Install your setup in target machine, You can view the shortcuts in Desktop and Start Menu.
Figure: Shortcut icon in Desktop

Figure: Shortcut icon in User’s Program Menu

III. Add Prerequisites

Prerequisites are provide support resources to run the installed process on your target machine.
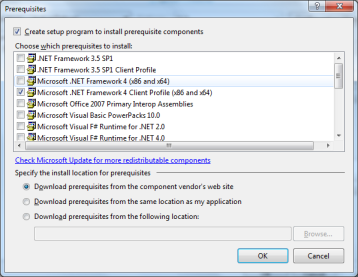
Visual Setup and Deployment projects are automatically detect the required prerequisites need to install the system. But the question is what is the source for install the prerequisites?  No need to worry, Visual Studio IDE provides three options to install the prerequisites on your system.
  • Download prerequisites from component vendor’s website (default option)
  • Download prerequisites from the same location as my application
  • Download prerequisites from the following location
How to add prerequisites in Visual Studio?
1. Select Project in Solution Explorer, Right click

2. Click the Prerequisites button in Property Pages

3. Select the required prerequisites from the window

Click ‘Ok’, prerequisites will associate based on your install location selection.